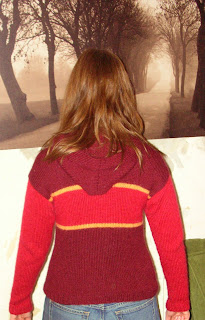
Under the Hoodie


Ta-da!! I'm finished!
Pattern: 'Under the Hoodie' from Stitch n Bitch: The Knitter's Handbook - a drop sleeve stocking stitch hoodie.
Yarn: Rowan Kid Classic [very very deliciously cosy!] in Cherry Red, Crushed Velvet, and a discontinued sandy yellow colour [I forget the name] - Aran weight.
Size: Small
Leftovers: Nearly 2 full balls of the main red, nearly a full ball of the yellow, and absolutely nothing of the bright red - I even pulled out my gauge square and used that!
If I made it again: I would do upto the armhole shaping in the round, so that the stripe changes would be easier - lining them up when seaming in quite difficult - esp. when the narrow stripe is only 3 rows.
I would possible make the sleeves in the round too, although I'm not sure if that would make sewing them into the body harder.
Pick up the stitches for the pocket with a bamboo needle if you are using metals [see below]
Changes I made: For the first sleeve I sewed it in as instructed. For the second I spread the front and back [joined at the shoulder, side seams not yet done] flat and measured the 8 inches from the shoulder on both front and back. I then pinned the sleeves and seamed them flat with mattress stitch, which was easier to keep it neat.
I couldn't however find any instructions on how to do mattress stitch using fabric needing to be seamed on the horizontal and vertical [does that make sense?] I could find loads on joining 2 pieces of vertical fabric, so after trial and error the method that worked for me was:
Vertical fabric - needle under 2 bars of the purl 'v's
Horizontal fabric - needle under 1 or one and half purl 'v's alternately [or under 2 and 3 strands of yarn]
That is extremely hard to describe, and I'm still not sure I can find a better way - a writer I am not!
The other change I made was to keep the shoulder stitches live on stitch holders and use a 3-needle bind off for a neater finish. I'm very proud of myself as, although this isn't a new technique, I did because it suddenly occured to me, rather than having read it - so for me it's my own idea!

Skills learnt: Picking up stitches for the pocket [above] These are picked up through the fabric from below - hooked up with the needle and made into a stitch. Rather than picking up a stitch from the fabric and knitting with that - I think the reason is for pocket strength. If I haven't explained it clearly, well neither did the pattern.
The Stitch n' Bitchers and I had some difficulty figuring this out, [KedKrafty helped me to get there] and caused much expletives and furrowed brow to understand the process - and also to prevent the hard fought for stitches from slipping off my Addis [which suddenly seemed like the slippiest needles on the planet!]
Another skill I learnt [below] was the very classy neck to hood shaping - starting from just after the stripe the fabric for the hood crosses over for a lovely effect - but again the pattern confused me into believing I should be picking up stitches along the neck line rather than alonf the row [horizontal] - got there in the end though.
 All in all a lovely knit - I will make this again in another yarn I'm sure - it's a good starter jumper.
Mine is a little tight because [yet again] the gauge square and the knitting bare no resemblence to each other. However, having knitted with Kid Classic before [here] I know that this will stretch out into a big comfy hoodie eventually - it is currently blocking to within an inch of it's life - with the aid of about 300 pins.
Huzah! What a wonderful hoodie - the colours look great and it looks ever so well made.
ReplyDeleteI fancy trying it myself - what yarn substitutes would you recommend? I'm a bit unsure about using the kid classic because, although it feels georgeous I'm a bit anxious about its magic stretching qualities...
Hi Elaine - it looks fabulous! You'll probably wear it as often as I wear my sweater (as often as I can).
ReplyDeleteSo far stetching has been minimal, but thats probably because I stretched it as I was knitting!!
so cute!! hopefully i get to see it in person this evening... xo
ReplyDeleteBrilliant! And thanks for all the tips about finishing, picking up for pocket etc. I've had the yarn for this tucked away in my stash for ages (olive green, turquoise and lilac....except I've a nasty feeling I've nibbled into some of these colours for other projects!)now I've seen how well the pattern works out I'm really going to have to organise myself to make it.
ReplyDeleteI love it! Looks so nice on! I am jealous of your knitting talents. I long to progress to clothing items not classed as accessories. x
ReplyDeleteHi! thanks for the comment on my blog. You're sweater looks awesome! I'm really glad to see your modifications. When I do knit this sweater, I will definitely be checking out how you did it to help me. And I LOVE your colors! Good job. :) (http://presemcemassage.tripod.com/blog)
ReplyDelete